All Categories
Featured
Table of Contents
- – Rv Fiberglass Roof Repair Guasti, CA
- – OCRV Center
- – Rv Rubber Roof Replacement Guasti, CA
- – Rubber Roof Installation Guasti, CA
- – Rv Rubber Roof Repair Guasti, CA
- – Rubber Roofing For Campers Guasti, CA
- – Best Rv Roof Repair Guasti, CA
- – Rv Trailer Roof Repair Guasti, CA
- – Rv Roof Maintenance Guasti, CA
- – Rv Roof Repair Fiberglass Guasti, CA
- – Motorhome Roof Replacement Guasti, CA
- – Rv Trailer Rubber Roof Repair Guasti, CA
- – Rubber Roof Installation Guasti, CA
- – Rubber Roof For Rv Guasti, CA
- – OCRV Center
Rv Fiberglass Roof Repair Guasti, CA
To attain best bond, use to both substrates with 5-6 mil coat weight and enable to completely dry, then laminate to membrane and use pressure with roller to guarantee 100% call. Diluent Water, if needed. Usage as obtained. Clean-up requires only warm water. Shop product in an awesome, dry location. Item must not be saved in direct sunlight.
Eye get in touch with If product contacts eye, flush with water for at least 15 minutes and seek clinical focus promptly. Skin call If item contacts skin, wash impacted area with soap and water.
Rv Rubber Roof Replacement Guasti, CA
Mask both sides of joint with masking tape. Cut nozzle to desired bead size. Pierce seal. Tons sealer cartridge in caulking weapon. Location nozzle right into joint and use sealer right into gap. Use above 40 deg F (5 deg C)Smooth or "device" bead if required. Eliminate covering up tape promptly. Clean hands and tools completely prior to cleaning with soap and water.
In situation of eye call flush eyes with water for 15 minutes and call a physician. In situation of skin call, completely clean skin with soap and water.
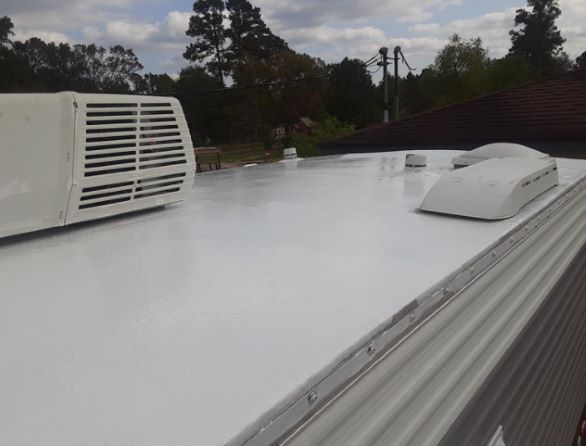
My Motor home roof covering that requires to be replaced! If you're like me and have even more time than cash, after that probably your best alternative is to purchase an old RV and repair it up.
I get it. I got my motor home over a year ago and didn't have the intestines to start tackling this task up until today. But I'm here to inform you, if I can do it, you can do it. Can I in fact do it? Remain tuned and find out! I got this 1993 Jamboree for $5000.
Rubber Roof Installation Guasti, CA
The catch? Water damages! I have actually never ever serviced a motor home prior to and I have to confess, I'm scared. I have actually done a lot of house makeover and I'm still frightened. That's because this is all new to me and I have no concept what to expect. Hopefully if you're considering doing this yourself, following along on my RV roofing replacement project will certainly give you the guts to dive in! The devices I utilized today.
That seemed to be my most inexpensive alternative.
I figured I would certainly instead have it semi-portable so I opted for the cover, plus this permits me to change the elevation backwards and forwards when I need to. Naturally the cheapest option of all would certainly be to simply throw a great tarpaulin over the top of your recreational vehicle for stormy days and just work with sunny days! Initially I raised the legs with 1 1/2 PVC pipe that fit inside the legs and after that I affixed a hose clamp around the PVC pipe to hold up the cover legs.
Rv Rubber Roof Repair Guasti, CA
Then I sawed 1 1/4 square legs from 24's to put inside the cover legs (once again holding the cover up with pipeline clamps.) and strengthening the four edges with an extra 24 screwed to it. This is still a little drooping. I most likely should have forked out for some inflexible steel pipeline from the beginning.
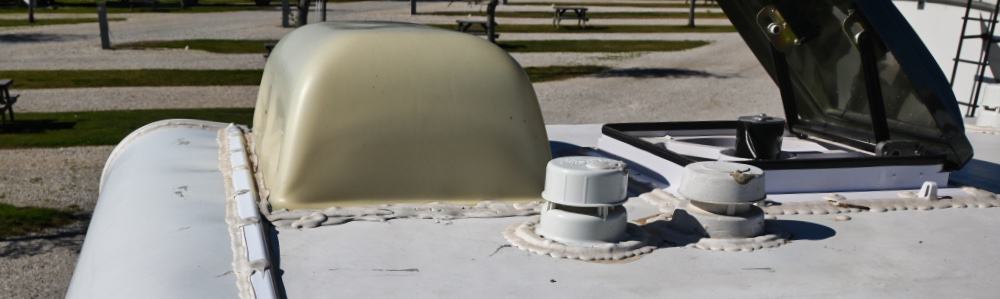
Fractures in the EPDM roof covering at side of camper. An old spot job on the RV rubber roofing. Tons of caulk stacked over old trouble areas. As you can see, this roof has actually had a great deal of problems over the years. Looking from the inside of the camper there have actually plainly been leakages in many locations of the roof.
I ordered an energy blade and started slicing. The initial point I observed is that there were 2 layers. On the bottom is the original EPDM rubber roof covering layer. I understand it's EPDM rubber and not TPO rubber because of the black support. (TPO roofing is white on both sides.) In addition to my EPDM roof is a thin motor home roof covering finishing that was applied later.
I just left the roofing covering stuck to the EPDM roof and drew them up together. Starting to peel off roofing system finish.
Rubber Roofing For Campers Guasti, CA
All rubber roof covering removed from camper. There was an adhesive under the lower layer of rubber that was still quite well stuck in lots of areas, yet with an excellent bit of force it peeled up cleanly.
Now I could see all the harmed plywood roofing system decking beneath. DIRECTS! You may not want to peel off the rubber! I chose to remove the rubber prior to eliminating fixtures so I might see what I was managing. I have to advise you, the old adhesive was still sticky, and a discomfort to stroll on.
Best Rv Roof Repair Guasti, CA
If you believe you'll be saving the roof covering decking plywood (not replacing it), after that you could conserve on your own some cleaning difficulty by removing the fixtures initially and after that peeling up the rubber! Detail of water damages on camper roofing. More water damaged areas on motor home roof covering decking. There was absolutely nothing really terrible that made me feel like I was mosting likely to fail, however most definitely a great deal of damages and I was getting the feeling I would certainly be replacing a great deal of the roofing system outdoor decking plywood.
I went for the easiest one first, an air vent cap from a cooking area sink plumbing vent pipeline. Beginning to scrape caulk and sealer. I used a rigid scraper with a chisel-like blade and just began spying and breaking and scratching and hacking. There is no various other means around this, you just have to start excavating until you subject the screw heads.
Loosening the screws in air vent cap. The screws on this vent cap were hex-head steel screws so I made use of a small socket chauffeur to eliminate them. Some appeared tidy. Others were rusted and I had to make use of a vice-grip pliers to get the heads and transform them little by little.
Rv Trailer Roof Repair Guasti, CA
I discovered an old wasp nest inside the air vent cover. This is a sight I'll possibly need to obtain used to, finding the remains of pet habitation in every nook and cranny. I spend a horrible great deal of my time developing great wild animals habitat in my yard so I do not get angered when a creature selects to set up home in my recreational vehicle.
Luckily nobody was home in this old nest so I just tossed it. Maybe I'll place a display over it when replacing it. Which brings us to the next point. You ought to attempt not to damage these items (like air vent covers and caps) as you're scratching off the old caulk and sealer just in case you require to use them once again.
My roof covering air vent also had a vent cover over it. Starting on the roof air vent. Equipment revealed on roof covering air vent cap, the very first nut came off tidy.
The bolts on this Motor home roof vent cover were nuts on little bolts. The 2nd one simply began rotating, suggesting the screw was not dealt with in location but turning along with the nut. A peek at the equipment holding down the roof covering air vent cover.
Rv Roof Maintenance Guasti, CA
I didn't have any kind of great means to hold the screw in position so rather I decided to saw via the bolts with a reciprocating saw. Sawing with bolts on roof covering vent cover. I utilized a cordless reciprocating saw with a metal-cutting blade but it was tricky to get the blade level adequate to reach the bolts so near to the roof covering deck.
Bending the blade a little bit to get to close to the roof covering deck. Cover removed from roofing system vent.
Rv Roof Repair Fiberglass Guasti, CA
The majority of were so old and rusted that they sheared off when I unscrewed then with a great deal of pressure. Unscrewing the braces that held the vent cover in position. After that I scraped more caulk and roofing sealant off the flange of the roof vent itself. I soon discovered there disappeared screws or equipment quieting so I gave up on the scraping and went inside the motor home After scratching the caulk and sealer from flange of roofing system air vent, say goodbye to screws! Unscrewing the inside cover plate of roof air vent fan in recreational vehicle shower room.
A pair sheared off with a great deal of pressure, yet two wouldn't budge. So I had to drill out the screw heads. I chose a drill bit close to the size of the shaft of the screws that I had already drawn out and began boring. Selecting a drill bit for drilling out a screw head.
Safety glasses recommended. I pierced out the heads, one popped off and the other I was obtaining frustrated with and offered it a pull prior to it was pierced via. Rather than popping off the screw head, the plastic simply dissolved around the hot screw head. Whoops. Hope I don't have to recycle this cover.
Lifting off the old roof vent. There are two wires running to the roof vent (a black warm cable and a white neutral cable) that you'll need to clip to eliminate the old vent.
Motorhome Roof Replacement Guasti, CA
These are the wires attaching the roof airing vent fan. Roofing system air vent removed and cleaned up. After clipping the wire and removing the air vent, I cleaned up any continuing to be goop and got my very first excellent look at the roof frame.
Some Motor home roofs are framed with timber, others have metal framework. I scratched off some rust and made a large mess inside the restroom.
Rv Trailer Rubber Roof Repair Guasti, CA
Oops. Perhaps I should have placed a tarp down. My final goal of the day was to get the refrigerator air vent cover off. I noticed motor home sealant blobs at four points on the cover so assumed there have to be screws under them. I tore them up and discovered Phillips screw heads.
Revealing the screws in the fridge air vent cap. Peeling old motor home roofing finish in addition to refrigerator vent cap I additionally noticed that there was a layer of RV roof covering coating over the air vent cap. These finishings are painted on with a brush so clearly whoever did this finish simply blobbed in on top of every little thing.
Some screws will certainly be too rusted and require pliers to get rid of. Prying off the fridge roofing air vent after all screws are gotten rid of. (and the tools utilized.) Virtually every screw was in sufficient problem to eliminate with an outlet motorist, but a pair were also corroded and required to be turned out with vice grip pliers.
I removed the staying rubber roof covering from under the flange and afterwards scraped off the old putty underneath. I'll cleanse it far better if and when I determine to reuse it. Appears like it remains in suitable form so I probably will. Removing the old putty from the flange of the refrigerator roof covering air vent.
Rubber Roof Installation Guasti, CA
Whether you simply drove off the dealership's whole lot or you have actually owned your camper for lots of years, you understand that your roofing system isn't under guarantee. Hence, you may want to get your trailer's roofing system replaced for the Life time Warranty and peace of mind. And we're licensed through the Recreational Car Sector Organization (RVIA) to repair and change Motor home roofings.
Dicor's Rubber Roofing system Repair work Membranes are self-adhesive strips of EPDM rubber that repairs splits, is highly immune to degeneration and has premium water resistance. And also, it includes no asphalt, solvent of VOCs, making it environmentally friendly.
Prying off the refrigerator roofing system vent after all screws are removed. Almost every screw was in excellent adequate condition to eliminate with an outlet motorist, however a pair were too rustic and needed to be turned out with vice grip pliers.
I peeled off the remaining rubber roof from under the flange and after that scratched off the old putty underneath. Scraping off the old putty from the flange of the fridge roofing air vent.
Rubber Roof For Rv Guasti, CA
Whether you just drove off the dealership's great deal or you've owned your camper for many years, you recognize that your roof covering isn't under service warranty. Therefore, you may want to get your trailer's roof covering replaced for the Life time Guarantee and tranquility of mind. And we're certified through the Recreational Automobile Market Organization (RVIA) to fix and change Motor home roofing systems.
Dicor's Rubber Roofing system Repair Membranes are self-adhesive strips of EPDM rubber that fixings tears, is extremely resistant to deterioration and has remarkable water resistance. Plus, it includes no asphalt, solvent of VOCs, making it eco-friendly.
Rv Roof Repair Near Me Guasti, CARubber Roof For Camper Guasti, CA
Rv Trailer Roof Repair Guasti, CA
Rv Rubber Roof Replacement Guasti, CA
Rv Roof Repair Service Near Me Guasti, CA
Motorhome Roof Replacement Guasti, CA
Rv Roof Repair Service Near Me Guasti, CA
Rubber Roof For Rv Guasti, CA
Rv Trailer Roof Repair Guasti, CA
Epdm Rv Roof Repair Guasti, CA
Best Rv Roof Repair Guasti, CA
Motorhome Roof Replacement Guasti, CA
Repair Rv Roof Guasti, CA
Rv Slide Out Roof Repair Guasti, CA
Rv Rubber Roof Replacement Cost Guasti, CA
Rv Roof Leak Repair Guasti, CA
Best Rv Roof Repair Guasti, CA
Rv Roof Leak Repair Guasti, CA
Rubber Roof Installation Guasti, CA
Rv Roof Replacement Guasti, CA
Rubber Roofing For Rv Guasti, CA
Rubber Roof For Rv Guasti, CA
Class C Rv Roof Repair Guasti, CA
Rv Rubber Roof Replacement Guasti, CA
Repair Rv Roof Guasti, CA
Rubber Roof For Rv Guasti, CA
Rubber Roof For Rv Guasti, CA
Rubber Roofing For Rv Guasti, CA
Rubber Roof Installation Guasti, CA
Class C Rv Roof Repair Guasti, CA
Rv Roof Maintenance Guasti, CA
Rv Slide Out Roof Repair Guasti, CA
Replace Rv Roof Guasti, CA
Rv Roof Repair Service Near Me Guasti, CA
Repair Rv Roof Guasti, CA
Rv Fiberglass Roof Repair Guasti, CA
Rv Roof Repair Near Me Guasti, CA
Best Rv Roof Repair Guasti, CA
Rv Trailer Rubber Roof Repair Guasti, CA
Rv Roof Repair Guasti, CA
Rubber Roof For Rv Guasti, CA
Rv Roof Repair Near Me Guasti, CA
Roof Repair For Rv Guasti, CA
Repair Rv Roof Leak Guasti, CA
Rv Roof Repair Guasti, CA
Rubber Roofing For Campers Guasti, CA
Rv Slide Out Roof Repair Guasti, CA
Rv Rubber Roof Repair Guasti, CA
Class C Rv Roof Repair Guasti, CA
Rv Roof Maintenance Guasti, CA
Rv Rubber Roof Repair Guasti, CA
Resealing Rv Roof Guasti, CA
Rv Roof Maintenance Guasti, CA
Repair Rv Roof Guasti, CA
Rubber Roof For Camper Guasti, CA
Rv Trailer Roof Repair Guasti, CA
Rv Roof Maintenance Guasti, CA
Rubber Roof For Camper Guasti, CA
Motorhome Roof Replacement Guasti, CA
Rv Roof Repair Near Me Guasti, CA
Epdm Rv Roof Repair Guasti, CA
Epdm Rv Roof Repair Guasti, CA
Rv Roof Repair Near Me Guasti, CA
Class C Rv Roof Repair Guasti, CA
Rubber Roofing For Rv Guasti, CA
Rv Roof Repair Near Me Guasti, CA
Resealing Rv Roof Guasti, CA
Repair Rv Roof Leak Guasti, CA
Rv Rubber Roof Repair Guasti, CA
Rv Roof Repair Fiberglass Guasti, CA
Rv Roof Leak Repair Near Me Guasti, CA
Motorhome Roof Replacement Guasti, CA
Motorhome Roof Replacement Guasti, CA
Motorhome Roof Replacement Guasti, CA
Best Rv Roof Repair Guasti, CA
Rv Roof Leak Repair Guasti, CA
Resealing Rv Roof Guasti, CA
Rv Fiberglass Roof Repair Guasti, CA
Find A Good Seo Marketing Guasti, CA
Finding A Good Local Seo Package Guasti, CA
Motorhome Roof Replacement Guasti, CA
OCRV Center
Table of Contents
- – Rv Fiberglass Roof Repair Guasti, CA
- – OCRV Center
- – Rv Rubber Roof Replacement Guasti, CA
- – Rubber Roof Installation Guasti, CA
- – Rv Rubber Roof Repair Guasti, CA
- – Rubber Roofing For Campers Guasti, CA
- – Best Rv Roof Repair Guasti, CA
- – Rv Trailer Roof Repair Guasti, CA
- – Rv Roof Maintenance Guasti, CA
- – Rv Roof Repair Fiberglass Guasti, CA
- – Motorhome Roof Replacement Guasti, CA
- – Rv Trailer Rubber Roof Repair Guasti, CA
- – Rubber Roof Installation Guasti, CA
- – Rubber Roof For Rv Guasti, CA
- – OCRV Center
Latest Posts
Best Dental Insurance For Seniors Santa Ana
Estate Planning Life Insurance Yorba Linda
Santa Ana Employee Benefits Center
More
Latest Posts
Best Dental Insurance For Seniors Santa Ana
Estate Planning Life Insurance Yorba Linda
Santa Ana Employee Benefits Center