All Categories
Featured
Table of Contents
- – Motorhome Roof Replacement Santa Ana, CA
- – OCRV Center
- – Rv Trailer Rubber Roof Repair Santa Ana, CA
- – Rv Trailer Rubber Roof Repair Santa Ana, CA
- – Repair Rv Roof Santa Ana, CA
- – Rv Rubber Roof Replacement Santa Ana, CA
- – Rv Rubber Roof Replacement Santa Ana, CA
- – Repair Rv Roof Santa Ana, CA
- – Repair Rv Roof Santa Ana, CA
- – Roof Repair For Rv Santa Ana, CA
- – Rv Roof Repair Service Near Me Santa Ana, CA
- – Rv Roof Repair Service Near Me Santa Ana, CA
- – Rv Rubber Roof Replacement Santa Ana, CA
- – Rv Fiberglass Roof Repair Santa Ana, CA
- – OCRV Center
Motorhome Roof Replacement Santa Ana, CA
Long story short, Progressive paid our whole initial Price quote - IN FULL. The client was very upset because they had Springtime Break outdoor camping plans, and we didn't know if we would certainly be able to obtain the fixings done in time due to all the hold-ups.

He called Progressive and must have been not-so-nice due to the fact that he got the adjustor's supervisor involved. When in charge man chatted to the consumer, he was playing it up large. He claimed so as to get the repair services done immediately so they could make their trip, we can purchase parts overnighted and they 'd cover it.
It was challenging throughout. Without going right into all of it, we did the roof our way - the appropriate means - and they really did not need the adjustor to find and examine it after tear-down. They allowed us to send photos which, naturally, revealed the damage left after wrecking the original EPDM.
Rv Trailer Rubber Roof Repair Santa Ana, CA
Offered all the problem Progressive had provided us over this repair, we meant to hang onto the motor home till we were ensured settlement of the final $1,542.75 they had actually kept for the roof fixings. When we contacted them they sent out a screenshot of the request for settlement to be issued, saying they "wished it would be enough." Due to the fact that we truly liked this consumer and he did have strategies, we allowed the motor home leave the shop on 3/30/18.
and really did not come ... and really did not come. When we called them again, they said they would certainly stop repayment and issue a brand-new one. We lastly got settlement 4/23/18. Obtained a one-line email from the client the other day: "Exactly how disappointing has this procedure been." He's looking for new insurance policy. Photos of roof with brand-new substratum, and then finished.
Rv Trailer Rubber Roof Repair Santa Ana, CA
Motor home roof fixing is essential. Ignoring it can compromise the honesty of your motor home traveling trailer or motorhome. And given that taking care of a tear in your rubber roof is so very easy, there's no factor to delay. Maybe you have actually uncovered from experience that RV rubber roof coverings and tree branches don't blend.
Due to its slow-moving aging rate in the sunlight, suppliers typically give a 10-12 year warranty on their EPDM rubber roofings. Many rubber roofs will see a life-span of 20+ years.
Repair Rv Roof Santa Ana, CA
Products like Flex Seal Liquid Rubber Sealant Coating can be found in a canister and are sprayed onto the broken location. The sealer seeps right into fractures and openings and stays flexible when dry. This fast and simple repair service technique functions well for small damages. Currently I'll describe just how to use a spot to the broken location, after that I'll discuss patch sets and recreational vehicle roofing repair tape in extra information.
Take an item of EPDM rubber membrane and make use of a razor knife (or sharp scissors) to reduce a spot 2 inches bigger than the broken location. Round the corners and leave no rugged sides. Center the patch over the damaged location and utilize a pen or pencil to draw a line around the spot, noting its area on your roof.
A scrub pad may be utilized on stubborn dust, discolorations, sap, etc. Clean the bottom of the spot also.
Rv Rubber Roof Replacement Santa Ana, CA
When completely dry, your task is done and your Recreational vehicle's roof need to be all set for rainfall. Spot sets make RV roof repair service even much easier.
Just stick the spot on and seal the side with the lap sealer. RV roofing repair work patch kit Tape is the simplest motor home roofing repair of all. EternaBond has actually been making a tough self-sealing tape for a variety of years currently. It's used just like any type of tape. Cut an item and lay it on your recreational vehicle roofing system over the broken area.
creates a long long-term watertight seal on a selection of surfaces, including EPDM rubber, TPO, Hypalon, steel, many PVC, tile, wood, and concrete (Rv Roof Leak Repair Santa Ana). It has excellent UV security and is stated to last even more than two decades. Recreational vehicle roofing system repair work tape by Dicor Dicor, the leading manufacturer of RV rubber roofs, has a self-sealing tape called Seal-Tite Tape
Rv Rubber Roof Replacement Santa Ana, CA
It quits leakages promptly and has a long life period too. As you would certainly when using a patch, you'll need to get rid of all dirt and gunk from your roofing system prior to applying the tape. RV roofing system repair work tape will not abide by silicone, so any kind of silicone caulking requires to be gotten rid of first.
Better to be risk-free than sorry and obtain it fixed currently., after that clean the area to remove all dirt and crud., which continues to be versatile when dried out.
Repair Rv Roof Santa Ana, CA
When completely dry, it has a smooth surface with a rubbery feeling. These tapes are longer enduring than lap sealer, and once you have actually sealed your joints with it, you most likely will never ever have to do it again.
My RV roofing that needs to be replaced! Welcome to my Motor Home Restoration Collection!.?.!! So you desire a motor home yet can not pay for one. If you're like me and have even more time than money, then probably your best choice is to purchase an old recreational vehicle and fix it up. If you occur to discover a really excellent bargain, after that possibilities are it has water damages.
I obtain it. I got my RV over a year ago and didn't have the guts to begin tackling this job until today. I purchased this 1993 Jamboree for $5000.
Repair Rv Roof Santa Ana, CA
The catch? Water damage! I have actually never ever serviced a RV before and I have to confess, I'm afraid. I have actually done a great deal of house renovation and I'm still terrified. That's because this is all new to me and I have no concept what to expect. With any luck if you're considering doing this on your own, adhering to along on my motor home roof replacement task will provide you the courage to dive in! The devices I utilized today.
I got a 12 x 26 SuperMax Cover by ShelterLogic (over $450 on Amazon however I bought mine from North Device for about $340!) and raised the legs with wood extensions to make the cover high enough that I can base on the roof covering and stroll beneath it. That appeared to be my most affordable alternative.
I figured I prefer to have it semi-portable so I chose the canopy, plus this allows me to adjust the height up and down when I need to. Of training course the least expensive alternative of all would be to simply toss a good tarpaulin over the top of your RV for stormy days and just service sunny days! Initially I raised the legs with 1 1/2 PVC pipeline that fit inside the legs and after that I attached a tube clamp around the PVC pipeline to stand up the cover legs.
Roof Repair For Rv Santa Ana, CA
I sawed 1 1/4 square legs from 24's to put inside the canopy legs (again holding the cover up with pipe clamps.) and strengthening the 4 corners with an added 24 screwed to it. This is still a little drooping. I possibly need to have forked out for some inflexible steel pipeline from the beginning.
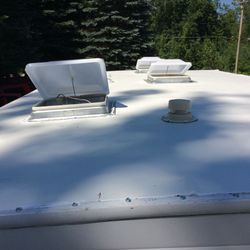
An old patch job on the Recreational vehicle rubber roofing system. As you can see, this roofing has had a great deal of issues over the years.
On the base is the initial EPDM rubber roof layer. I understand it's EPDM rubber and not TPO rubber due to the fact that of the black support. On top of my EPDM roofing is a thin Motor home roof layer that was used later.
I simply left the roof covering stuck to the EPDM roofing and pulled them up with each other. Beginning to peel off roof covering finishing.
Rv Roof Repair Service Near Me Santa Ana, CA
I reduced lines with an energy blade around fixtures. All rubber roof covering eliminated from camper. This step went rather promptly. There was an adhesive under the bottom layer of rubber that was still quite well stuck in several locations, however with an excellent little bit of pressure it peeled up cleanly.
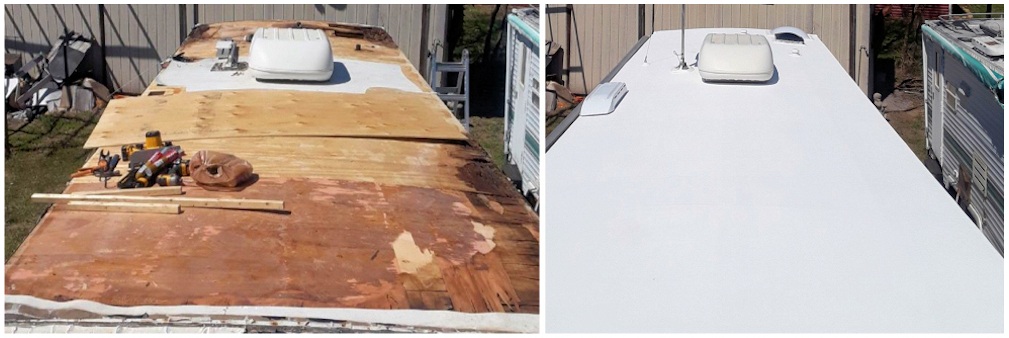
Now I could see all the harmed plywood roof covering outdoor decking below. I picked to peel off the rubber before eliminating components just so I might see what I was dealing with.
Rv Roof Repair Service Near Me Santa Ana, CA
If you assume you'll be conserving the roofing decking plywood (not changing it), then you could conserve on your own some cleaning difficulty by removing the components initially and after that peeling up the rubber! A lot more water harmed locations on RV roofing system decking.
I went for the simplest one initially, a vent cap from a kitchen sink plumbing vent pipe. There is no other means around this, you simply have to begin excavating up until you subject the screw heads.
Loosening the screws in air vent cap. The screws on this vent cap were hex-head steel screws so I used a little outlet driver to eliminate them.
I discovered an old wasp nest inside the vent cover. This is a view I'll most likely need to obtain used to, locating the remains of animal habitation in every nook and cranny. I invest an awful lot of my time creating excellent wildlife environment in my lawn so I don't get upset when a creature picks to establish up home in my motor home.
Rv Rubber Roof Replacement Santa Ana, CA
Thankfully no one was home in this old nest so I simply tossed it. You need to try not to harm these items (like vent covers and caps) as you're scuffing off the old caulk and sealer simply in instance you require to use them once more.
Following I made a decision to deal with the only roof covering ventilation fan that my camper has. My roof air vent also had an air vent cover over it. Beginning on the roofing air vent.
Screw is spinning. The bolts on this recreational vehicle roofing air vent cover were nuts on little bolts. The first one came off great with an expansion socket kit. The 2nd one just started spinning, suggesting the screw was not fixed in area but transforming together with the nut. Drag. A peek at the hardware holding back the roof vent cover.
I really did not have any type of great means to hold the screw in area so rather I chose to saw with the screws with a reciprocating saw. Sawing via screws on roof covering air vent cover. I used a cordless reciprocating saw with a metal-cutting blade however it was tricky to get the blade flat adequate to reach the screws so close to the roofing deck.
Rv Fiberglass Roof Repair Santa Ana, CA
Bending the blade a little bit to reach near to the roof deck. Once I had actually sawn through the continuing to be 3 bolts, I tore up the cover. The brackets that were holding the cover in location. Cover eliminated from roof covering vent. I loosened the braces from the flange of the air vent follower itself.
The majority of were so old and rusted that they sheared off when I unscrewed then with a lot of pressure. Loosening the brackets that held the vent cover in place. Then I scraped extra caulk and roof sealant off the flange of the roofing vent itself. I soon uncovered there disappeared screws or equipment quieting so I quit on the scraping and went inside the recreational vehicle After scratching the caulk and sealant from flange of roofing system air vent, say goodbye to screws! Unscrewing the inside cover plate of roof covering air vent fan in recreational vehicle restroom.
I selected a drill little bit close to the size of the shaft of the screws that I had actually currently drawn out and began exploration. Choosing a drill little bit for piercing out a screw head.
OCRV Center
Address: 23281 La Palma Ave Yorba Linda, CA 92887Phone: (714) 909-1444
Email: [email protected]
OCRV Center
Shatterproof glass advised. So I pierced out the heads, one stood out off and the various other I was getting irritated with and gave it a yank before it was drilled through. As opposed to popping off the screw head, the plastic simply melted away around the hot screw head. Whoops. Hope I don't have to recycle this cover.
Rv Fiberglass Roof Repair Santa Ana, CARv Rubber Roof Repair Santa Ana, CA
Rv Rubber Roof Repair Santa Ana, CA
Rv Roof Leak Repair Near Me Santa Ana, CA
Rv Roof Repair Santa Ana, CA
Rv Roof Repair Service Near Me Santa Ana, CA
Rv Roof Repair Service Near Me Santa Ana, CA
Rv Trailer Rubber Roof Repair Santa Ana, CA
Rv Roof Leak Repair Santa Ana, CA
Class C Rv Roof Repair Santa Ana, CA
Rv Rubber Roof Replacement Cost Santa Ana, CA
Replace Rv Roof Santa Ana, CA
Rv Roof Repair Service Near Me Santa Ana, CA
Rubber Roofing For Campers Santa Ana, CA
Rv Roof Leak Repair Santa Ana, CA
Epdm Rv Roof Repair Santa Ana, CA
Repair Rv Roof Leak Santa Ana, CA
Rubber Roofing For Campers Santa Ana, CA
Rv Roof Replacement Santa Ana, CA
Rv Fiberglass Roof Repair Santa Ana, CA
Rubber Roof Installation Santa Ana, CA
Rv Trailer Rubber Roof Repair Santa Ana, CA
Rv Roof Replacement Santa Ana, CA
Replace Rv Roof Santa Ana, CA
Rv Roof Repair Near Me Santa Ana, CA
Repair Rv Roof Leak Santa Ana, CA
Rv Roof Replacement Santa Ana, CA
Rv Roof Repair Near Me Santa Ana, CA
Rv Rubber Roof Repair Santa Ana, CA
Rubber Roofing For Campers Santa Ana, CA
Roof Repair For Rv Santa Ana, CA
Repair Rv Roof Leak Santa Ana, CA
Roof Repair For Rv Santa Ana, CA
Rubber Roof For Camper Santa Ana, CA
Best Rv Roof Repair Santa Ana, CA
Replace Rv Roof Santa Ana, CA
Rv Fiberglass Roof Repair Santa Ana, CA
Rv Fiberglass Roof Repair Santa Ana, CA
Rv Rubber Roof Repair Santa Ana, CA
Best Rv Roof Repair Santa Ana, CA
Rubber Roofing For Rv Santa Ana, CA
Rubber Roof For Camper Santa Ana, CA
Rv Roof Repair Near Me Santa Ana, CA
Class C Rv Roof Repair Santa Ana, CA
Replace Rv Roof Santa Ana, CA
Rv Slide Out Roof Repair Santa Ana, CA
Rv Roof Leak Repair Near Me Santa Ana, CA
Rv Fiberglass Roof Repair Santa Ana, CA
Rv Roof Replacement Santa Ana, CA
Rv Roof Leak Repair Near Me Santa Ana, CA
Epdm Rv Roof Repair Santa Ana, CA
Rv Roof Leak Repair Santa Ana, CA
Rv Roof Repair Santa Ana, CA
Rubber Roof For Rv Santa Ana, CA
Resealing Rv Roof Santa Ana, CA
Rubber Roofing For Campers Santa Ana, CA
Motorhome Roof Replacement Santa Ana, CA
Rv Roof Repair Service Near Me Santa Ana, CA
Rubber Roof For Camper Santa Ana, CA
Rv Roof Leak Repair Santa Ana, CA
Class C Rv Roof Repair Santa Ana, CA
Best Rv Roof Repair Santa Ana, CA
Rubber Roof Installation Santa Ana, CA
Rv Rubber Roof Maintenance Santa Ana, CA
Rv Trailer Roof Repair Santa Ana, CA
Rv Rubber Roof Replacement Cost Santa Ana, CA
Rv Roof Repair Service Near Me Santa Ana, CA
Rubber Roofing For Campers Santa Ana, CA
Epdm Rv Roof Repair Santa Ana, CA
Rv Slide Out Roof Repair Santa Ana, CA
Epdm Rv Roof Repair Santa Ana, CA
Replace Rv Roof Santa Ana, CA
Rubber Roof For Rv Santa Ana, CA
Resealing Rv Roof Santa Ana, CA
Rubber Roofing For Campers Santa Ana, CA
Rubber Roof Installation Santa Ana, CA
Repair Rv Roof Santa Ana, CA
Class C Rv Roof Repair Santa Ana, CA
Companies Near Me Seo Companies Near Me Santa Ana, CA
Near You Seo Citations Santa Ana, CA
Rv Roof Leak Repair Santa Ana, CA
OCRV Center
Table of Contents
- – Motorhome Roof Replacement Santa Ana, CA
- – OCRV Center
- – Rv Trailer Rubber Roof Repair Santa Ana, CA
- – Rv Trailer Rubber Roof Repair Santa Ana, CA
- – Repair Rv Roof Santa Ana, CA
- – Rv Rubber Roof Replacement Santa Ana, CA
- – Rv Rubber Roof Replacement Santa Ana, CA
- – Repair Rv Roof Santa Ana, CA
- – Repair Rv Roof Santa Ana, CA
- – Roof Repair For Rv Santa Ana, CA
- – Rv Roof Repair Service Near Me Santa Ana, CA
- – Rv Roof Repair Service Near Me Santa Ana, CA
- – Rv Rubber Roof Replacement Santa Ana, CA
- – Rv Fiberglass Roof Repair Santa Ana, CA
- – OCRV Center
Latest Posts
Inexpensive Dental Insurance For Seniors Aliso Viejo
Costa Mesa Health Insurance Plans For Family
Employee Benefits Brokerage Firms Orange County
More
Latest Posts
Inexpensive Dental Insurance For Seniors Aliso Viejo
Costa Mesa Health Insurance Plans For Family
Employee Benefits Brokerage Firms Orange County