All Categories
Featured
Table of Contents
- – Full Service Rv Repair Near Me Norco, CA
- – OCRV Center
- – Motorhome Repair Shops Norco, CA
- – Rv Generator Repair Norco, CA
- – Rv Service Repair Near Me Norco, CA
- – Rv Service And Repair Near Me Norco, CA
- – Rv Repair In My Area Norco, CA
- – Camper Ac Repair Near Me Norco, CA
- – Rv Ceiling Repair Norco, CA
- – Rv Repair And Service Near Me Norco, CA
- – Rv Plumbing Repair Near Me Norco, CA
- – Best Rv Repair Near Me Norco, CA
- – Rv Repair Centers Near Me Norco, CA
- – OCRV Center
Full Service Rv Repair Near Me Norco, CA
A 1000W inverter would certainly suffice for the majority of recreational vehicle needs.: Pure sine wave inverters are best for delicate electronic devices, while customized sine wave inverters are less expensive and adequate for basic needs.: Safeguards the photovoltaic panels to your motor home roof.: You can make use of a placing set or pick individual placing brackets, depending on the panel size and your recreational vehicle's roof covering.
: MC4 adapters for the solar panel wiring and battery terminals for connecting the batteries to the system. The very best location is typically a flat, unshaded area on the roof of your RV. Make sure the panels will obtain maximum direct exposure to the sun for the bulk of the day. Avoid areas that are shaded by vents, ac system, or other roofing system equipment.
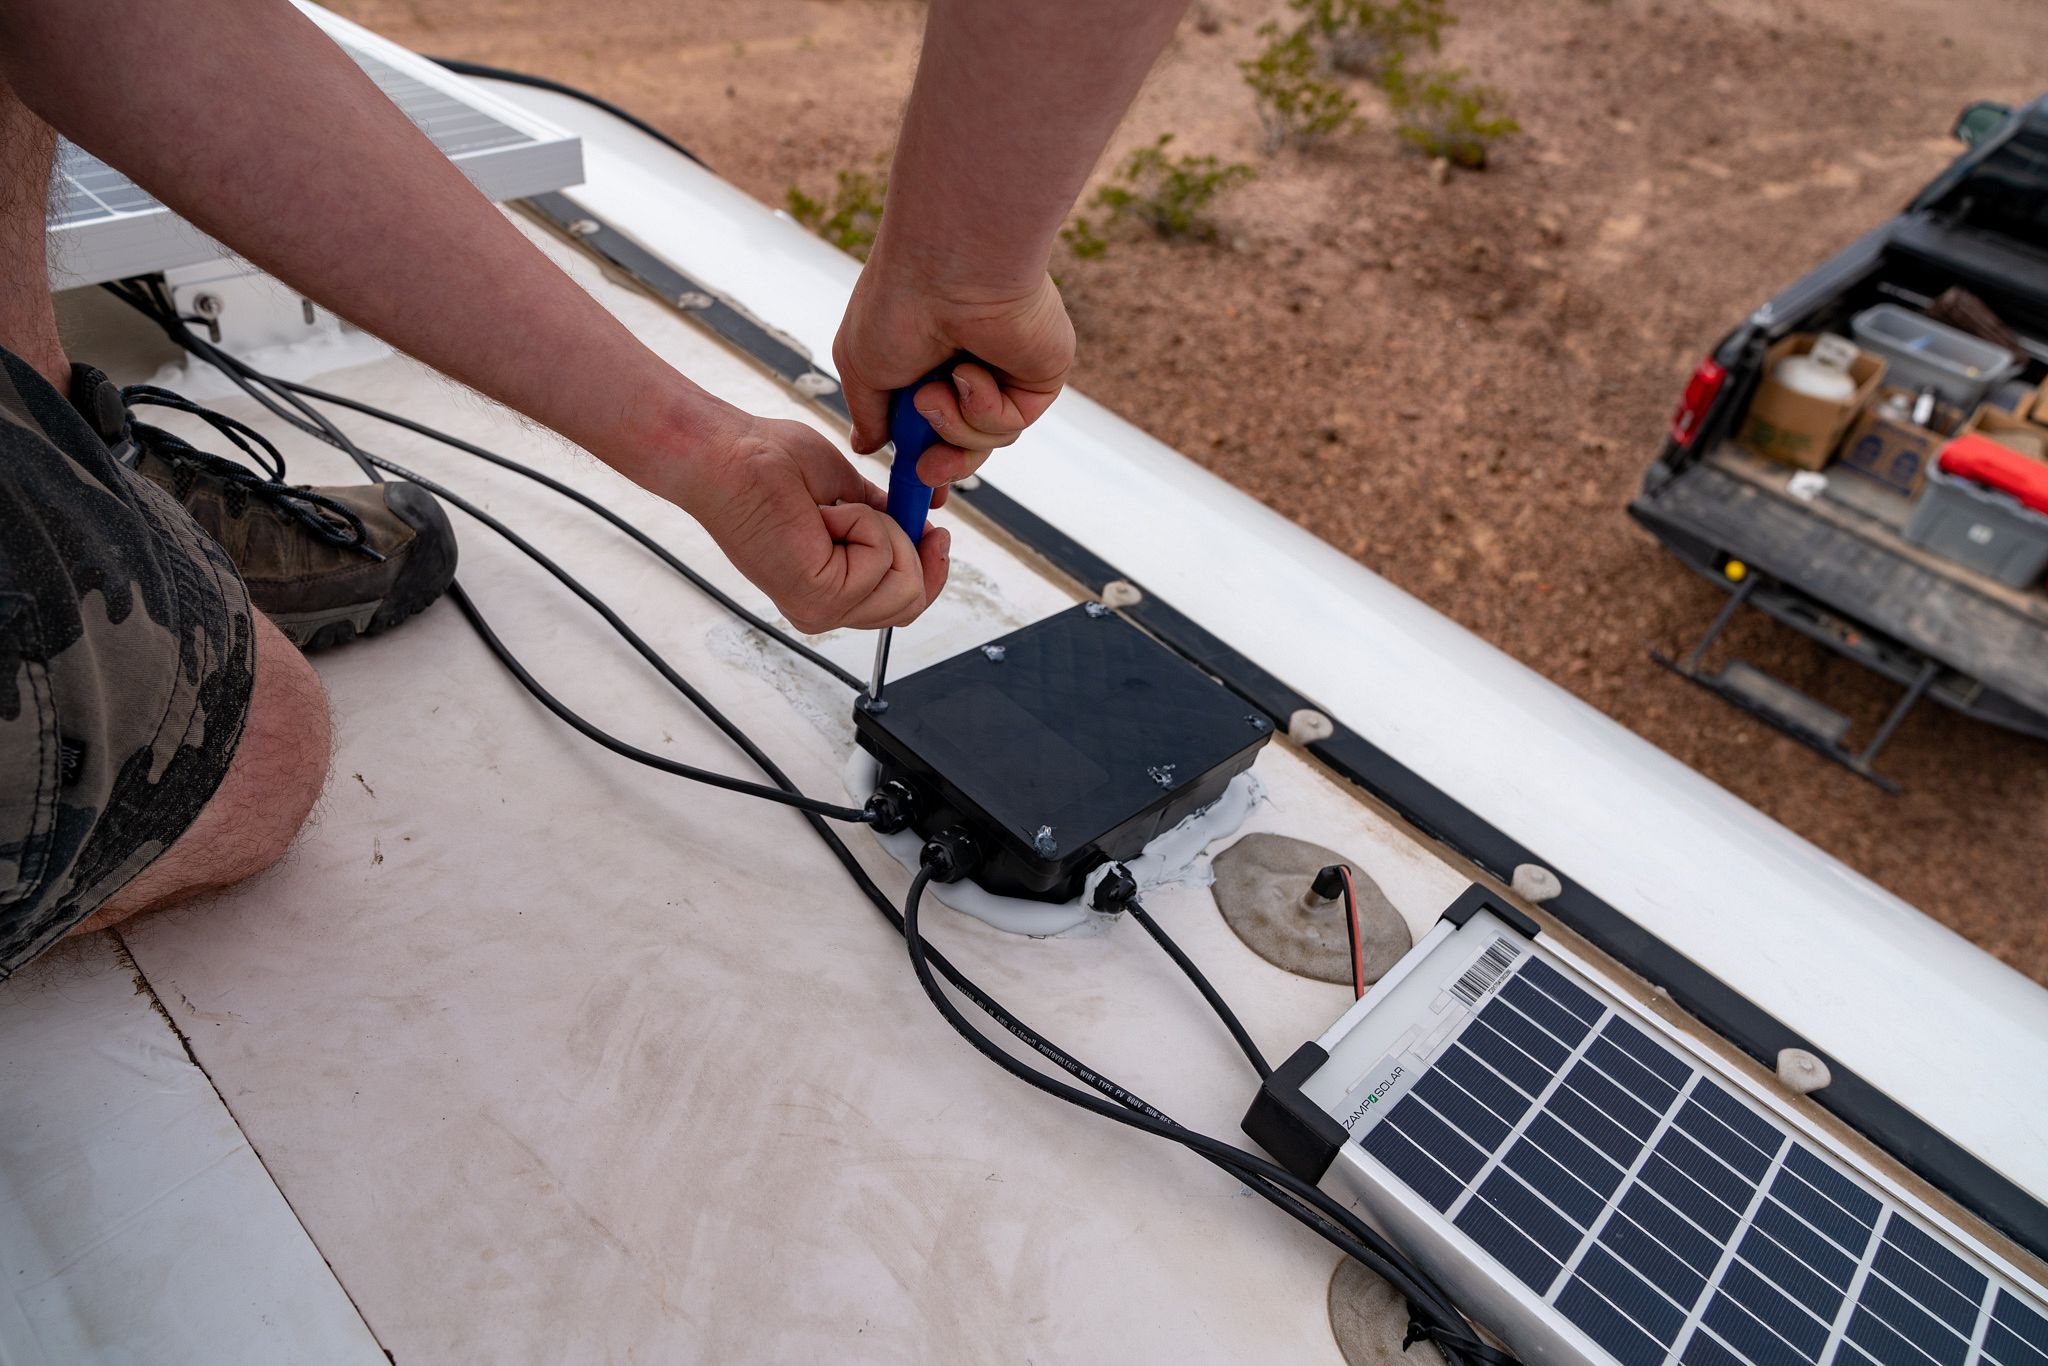
: For an extra secure installing, you can utilize roof brackets developed for solar panels. Ensure the installing hardware is compatible with your panel type and the roof product of your RV (Norco Rv Repair Service Near Me). If you are making use of brackets, drill little openings for the placing screws, making certain to secure them properly to avoid leaks
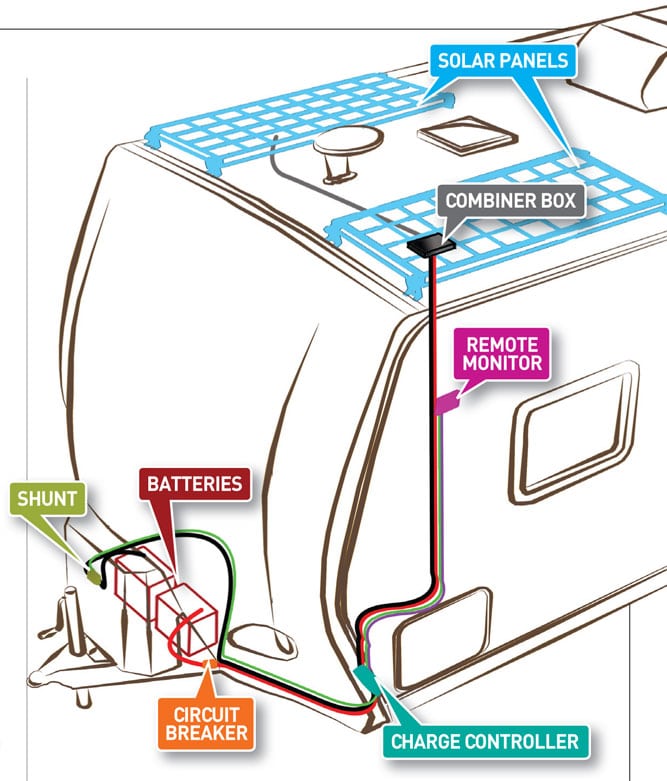
Make sure the electrical wiring is secured from the aspects and protected to the roof covering to prevent damages from wind or roadway resonances. Find a cool, completely dry, and quickly accessible place for the fee controller, usually near the battery bank. This will minimize wire length and possible power loss. Link the charge controller to both the solar panels (input) and the batteries (result).
Motorhome Repair Shops Norco, CA
A lot of motor home planetary systems utilize 12V systems, so you'll likely wire the batteries in parallel.: Connect the favorable terminals of the batteries with each other and the unfavorable terminals with each other. Then attach the bank to the fee controller. Select an area for the inverter where it will be well-ventilated and shielded from the aspects.
Cable the inverter's Air conditioner result to your Motor home's electric panel, which powers your AC tools (refrigerator, lights, and so on). When whatever is connected, it's time to check your RV solar system.: Make certain it's charging the batteries properly and the system is working as expected.: Utilize a multimeter to examine battery voltage and ensure it's within the suggested range.
Rv Generator Repair Norco, CA
Start with small devices and slowly boost to bigger ones like the fridge or air conditioner.: on a regular basis to ensure they are without dust, dirt, and debris.: On a regular basis inspect battery voltage and charge degrees to avoid over-discharging.: Inspect all circuitry and links periodically for wear, corrosion, or loosened connections.
This program is created for the recreational vehicle Technician, RV Assessor, or RV owner that wants solar energy equipment for the RV. Trainees progress assessment, analysis, and repairing skills of solar power as it connects to RV procedures. Students will certainly learn how to select, mount, run, and preserve solar power along with just how to isolate and fix solar devices issues.
Rv Service Repair Near Me Norco, CA
Solar Panel Install- Mayhem, Kiddos & Consistency In the last couple of years, RVing has actually ended up being progressively more popular. The alternatives of where to stay have become wide open for RVers. Not only do you have options to remain at motor home Parks and RV Resorts, being off the grid or boondocking has ended up being an extra traditional choice and much less frightening.
A wonderful solution is solar power systems, unlike gas powered generators, solar energy a solar energy system is just that, a system. It is greater than simply the 2 primary elements of batteries and panels. There are 5 fundamental parts to a solar power system which is detailed below.
Rv Service And Repair Near Me Norco, CA
Possibilities are you will require an inverter. The transfer switch is an expensive name to change between inverter power (solar power) and direct link (called it's naval name of "coast power"). This button makes certain that power is coming from one source and not both at any offered time. The excellent information is, a lot of the time the inverter likewise consists of a transfer switch, so extra parts might not be needed.
Much like the batteries in your TV remote or kid's toys, they save power and supply it when you need it. The difference here is, relying on what you require power for, you require a great deal more power than the TV remote. There are 3 major kinds of batteries: LifePO4 Lithium, AGM (Lead Acid), and Flooded Cell (Lead Acid).
Mount a fuse or breaker on cords coming from the solar panels to the charge controller. Do not attach solar panels to charge controller till action 9.
Mount your inverter near the batteries and maintain it away from warm sources or any kind of various other unsafe materials (destructive). It is recommended that you utilize 120 Thermal Circuit breaker for each battery.
Rv Repair In My Area Norco, CA
Now the system is 99% done. Prior to the last step, double-check that all electrical wiring is appropriate when it involves polarity (favorable and unfavorable). From the solar panels all the method to the battery connections. Make certain you cover the solar panels to make sure no electrical power is being gotten into the system.
Enjoy the amazing power of the Sunlight! Having the ability to have a solar energy system is a video game changer. It opens up a flexibility that you would or else not have. When considering systems ask around and do your research study. Batteries play a detailed role on the length of time you can remain and play in these remote areas.
As soon as the solar system determines that your home batteries are completely billed, it will then direct some of that power to the framework battery. To figure out for how long your recreational vehicle's solar cell bank will last, we use an easy mathematics formula(beginning watching at the 2:06 mark) that entails: determining your batteries' amp hours wiring them in collection and parallel transforming that final number to watt hours given that most items that use your battery power are gauged in wattage establishing a safe usage array that won't harm your batteries When you've developed this overall watt hours number, separate into it making use of the wattage amounts from the lights, appliances, and various other recreational vehicle amenities you'll be making use of.
These photovoltaic panels are created to catch sunshine and convert it right into usable electrical power that can be used to charge batteries, run appliances, and provide power for numerous features within the RV. The power generated by the solar panels can be stored in batteries, allowing motor home owners to have a lasting and environmentally friendly source of power even when they're not linked to conventional electric outlets.
Camper Ac Repair Near Me Norco, CA
There are pure sine wave inverters (suitable for delicate electronic devices) and modified sine wave inverters. Deep cycle batteries save the power harvested by the photovoltaic panels. There are various types, including lead-acid, AGM (Absorbing Glass Floor covering), gel, and lithium-ion, with each having its very own benefits and drawbacks. This consists of brackets, installs, and clamps to securely affix photovoltaic panels to the recreational vehicle's roofing.
From monocrystalline to polycrystalline, thin-film to versatile panels, there's a wide-range of solar energy options to fit your certain demands. When picking the suitable photovoltaic panel for your camper, monocrystalline photovoltaic panels attract attention as a preferred and super-efficient option. These panels are crafted from a single crystal structure, making them very effective in converting sunshine into useful electrical energy.
Rv Ceiling Repair Norco, CA
: Inflexible panels are developed with a solid frame and protective glass cover, making them long lasting and suitable for stationary installations. They are frequently installed on the level roof of a recreational vehicle, making sure security and optimal energy production. Adaptable panels, developed to flex and adapt, are excellent for bent recreational vehicle surfaces.
Our group of qualified Motor home specialists is constantly on standby, delighted to address any kind of continuing to be questions concerning solar panels you might have. Buttons Bish's Motor home Web content Supervisor With over 10 years in the RV sector, Greg incorporates firsthand car dealership experience with an interest for assisting people find the right RV for their journeys.
(Read why we transitioned from van life to Airstream life right here!) However, despite having my restricted understanding of solar systems at the time, I recognized it wouldn't amount to much. After inspecting it even more, the fact was that it had not been actually a system whatsoever. Many traveling trailers just aren't designed for dispersed camping off the great deal, and Airstreams are no exemption.
Rv Repair And Service Near Me Norco, CA
Confronted with the limitations of these stock solar systems, the majority of RVers just use gas or diesel-powered generators to maintain their batteries completed while camping off-grid. Nevertheless, we made a decision at an early stage that we did not want to travel with a generator. Our primary argument was the constant noise, but generators have various other drawbacks.
As you may anticipate, the initial choice was concerning a 3rd of the expense of choice 2, and the DIY choice was about half the price for both choices. At the time, the idea of mounting our very own solar system was a little bit overwhelming.
Bear in mind that pricing can differ drastically depending upon the dimension of your wanted system, and what you intend to power. Our 28 Airstream has restricted "real estate" on the roof covering for photovoltaic panels, but you can go quite crazy with a 45 5th Wheel. After some to and fro, we determined to go with alternative one and the DIY set up choice.
(Not certain what any of this suggests?! I had not been sure at very first either, but I can ensure you that AM Solar does. Switching to lithium batteries made complex the mount, however because lithium batteries can be drawn down substantially further than lead acid batteries, it was certainly worth the effort.
Rv Plumbing Repair Near Me Norco, CA
I got ta be straightforward, when I initially opened up the box of parts from AM Solar I was overwhelmed with the thought of, "What the heck have I obtained myself right into?" It took some time, once I outlined all of the components and referenced the layout, I had the ability to cover my head around just how it all functioned.
They also have a specialized helpline for full-time RVers that needed immediate support. Speak about customer support! It really did not take us long to recognize that we possibly ought to have gone with the more robust system advised by AM Solar. Under perfect sun conditions, our panels could keep our batteries complemented, but a couple of days of cloud cover or rain and we would locate ourselves requiring to connect in.
I will certainly admit, I was a little anxious having their technologies evaluate my job, however they provided me two thumbs up and told me it was just one of the much better DIY installs they had seen. (RATING!) It was a nice rub on the back, and a good confidence increase introducing what would be an additional big recreational vehicle job.
I had a whole lot more confidence going right into this mount and I discovered myself really enjoying the procedure. I didn't also mind drilling that dreadful hole via the roof covering of our Airstream! As of March 2023, we have actually had this updated system for even more than nine months and are excited by just how it has actually stayed on par with our requirements.
Best Rv Repair Near Me Norco, CA
their do it yourself setup choice. As you might anticipate, the very first option had to do with a third of the expense of alternative two, and the do it yourself choice had to do with half the rate for both choices. At the time, the idea of installing our own solar system was a little bit frustrating. Despite being a quite useful guy, electric was constantly something that was outside of my proficiency.
Remember that rates can differ considerably relying on the size of your preferred system, and what you mean to power. Our 28 Airstream has restricted "property" on the roofing for photovoltaic panels, yet you can go quite crazy with a 45 Fifth Wheel. After some backward and forward, we decided to go with alternative one and the do it yourself set up choice.
(Not certain what any of this implies?! I wasn't sure at initial either, yet I can guarantee you that AM Solar does. Changing to lithium batteries complicated the install, but since lithium batteries can be drawn down dramatically farther than lead acid batteries, it was most definitely worth the effort.
Rv Repair Centers Near Me Norco, CA
I got ta be truthful, when I initially opened package of components from AM Solar I was bewildered with the idea of, "What the heck have I obtained myself right into?" It took a while, but once I set out every one of the components and referenced the layout, I was able to wrap my head around just how everything worked.
They also have a specialized helpline for permanent RVers that needed prompt assistance. Talk regarding client service! It didn't take us long to realize that we most likely ought to have opted for the more durable system recommended by AM Solar. Under excellent sun problems, our panels might keep our batteries completed, yet a couple of days of cloud cover or rain and we would certainly locate ourselves needing to plug in.
I will certainly admit, I was a little worried having their technologies evaluate my work, yet they gave me 2 thumbs up and informed me it was just one of the better do it yourself mounts they had actually seen. (RATING!) It was a great pat on the back, and a good self-confidence boost introducing what would certainly be an additional huge RV job.
OCRV Center
Address: 23281 La Palma Ave Yorba Linda, CA 92887Phone: (714) 909-1444
Email: [email protected]
OCRV Center
I had a whole lot more confidence entering into this install and I located myself actually delighting in the procedure. I really did not also mind piercing that dreaded hole through the roof of our Airstream! Since March 2023, we've had this updated system for even more than nine months and are impressed by how it has kept up with our requirements.
Rv Repair Services Near Me Norco, CARv Mechanics Near Me Norco, CA
Rv Repair Shops Near My Location Norco, CA
Rv Repairs Near Me Norco, CA
Rv Repair Services Near Me Norco, CA
Rv Service And Repair Near Me Norco, CA
Best Rv Repair Near Me Norco, CA
Rv Plumbing Repair Near Me Norco, CA
Rv Service And Repair Near Me Norco, CA
Best Rv Repair Near Me Norco, CA
Rv Repair And Service Near Me Norco, CA
Rv Plumbing Repair Near Me Norco, CA
Rv Repair Shops Near My Location Norco, CA
Motorhome Repair Shops Norco, CA
Best Rv Repair Near Me Norco, CA
Motorhome Repair Service Norco, CA
Motorhome Generator Repair Near Me Norco, CA
Rv Repair Places Near Me Norco, CA
Rv Repair Services Near Me Norco, CA
Rv Repair Services Near Me Norco, CA
Rv Repair Services Near Me Norco, CA
Rv Solar Installation Norco, CA
Motorhome Repair Service Norco, CA
Rv Mechanics Near Me Norco, CA
Rv Repair Services Near Me Norco, CA
Motorhome Refrigerator Repair Norco, CA
Rv Refrigerator Repair Near Me Norco, CA
Rv Repair Centers Near Me Norco, CA
Rv Ceiling Repair Norco, CA
Motorhome Refrigerator Repair Norco, CA
Motorhome Repair Shops Norco, CA
Best Rv Repair Near Me Norco, CA
Motorhome Repair Shop Norco, CA
Motorhome Generator Repair Near Me Norco, CA
Rv Generator Repair Norco, CA
Rv Plumbing Repair Near Me Norco, CA
Rv Service Repair Near Me Norco, CA
Motorhome Repair Shop Norco, CA
Best Rv Repair Near Me Norco, CA
Rv Mechanics Near Me Norco, CA
Motorhome Repair Shops Norco, CA
Rv Repair Centers Near Me Norco, CA
Rv Solar Panel Installation Norco, CA
Rv Floor Repair Near Me Norco, CA
Motorhome Repair Service Norco, CA
Full Service Rv Repair Near Me Norco, CA
Rv Repair In My Area Norco, CA
Rv Repair Services Near Me Norco, CA
Rv Repair Shops Near My Location Norco, CA
Motorhome Repair Shop Norco, CA
Motorhome Service And Repair Near Me Norco, CA
Rv Service Repair Near Me Norco, CA
Rv Mechanics Near Me Norco, CA
Motorhome Service And Repair Near Me Norco, CA
Rv Plumbing Repair Near Me Norco, CA
Rv Service Repair Near Me Norco, CA
Camper Ac Repair Near Me Norco, CA
Motorhome Repair Shops Norco, CA
Rv Repair Services Near Me Norco, CA
Motorhome Awning Repair Norco, CA
Motorhome Generator Repair Near Me Norco, CA
Motorhome Repair Service Norco, CA
Rv Solar Panel Installation Norco, CA
Rv Solar Installation Norco, CA
Rv Repair And Service Near Me Norco, CA
Rv Repair And Service Near Me Norco, CA
Rv Solar Installation Norco, CA
Rv Generator Repair Norco, CA
Rv Repair Shops Near My Location Norco, CA
Rv Floor Repair Near Me Norco, CA
Rv Refrigerator Repair Near Me Norco, CA
Rv Repair And Service Near Me Norco, CA
Rv Repair And Service Near Me Norco, CA
Full Service Rv Repair Near Me Norco, CA
Rv Service And Repair Near Me Norco, CA
Rv Delamination Repair Near Me Norco, CA
Rv Solar Installation Norco, CA
Rv Repair Places Near Me Norco, CA
Finding A Local Seo Optimization Norco, CA
Around Here Seo Companies Norco, CA
OCRV Center
Table of Contents
- – Full Service Rv Repair Near Me Norco, CA
- – OCRV Center
- – Motorhome Repair Shops Norco, CA
- – Rv Generator Repair Norco, CA
- – Rv Service Repair Near Me Norco, CA
- – Rv Service And Repair Near Me Norco, CA
- – Rv Repair In My Area Norco, CA
- – Camper Ac Repair Near Me Norco, CA
- – Rv Ceiling Repair Norco, CA
- – Rv Repair And Service Near Me Norco, CA
- – Rv Plumbing Repair Near Me Norco, CA
- – Best Rv Repair Near Me Norco, CA
- – Rv Repair Centers Near Me Norco, CA
- – OCRV Center
Latest Posts
Monterey Park Evaporative Cooler Installation
Commercial Duct Cleaning Service Sunland
Heating And Air Conditioning Repair Sunland
More
Latest Posts
Monterey Park Evaporative Cooler Installation
Commercial Duct Cleaning Service Sunland
Heating And Air Conditioning Repair Sunland